Bubora Academy
First steps to follow with your Shopify Automated Shop
We've outlined the first steps you should follow in your Shopify store before you start selling.
Congratulations! Now you own an automated store, you are almost ready to start selling. We 've almost everything set up for in yor shop. Now, all you have to do now is to follow this simple steps to start selling.
Setting up payment options in Shopify
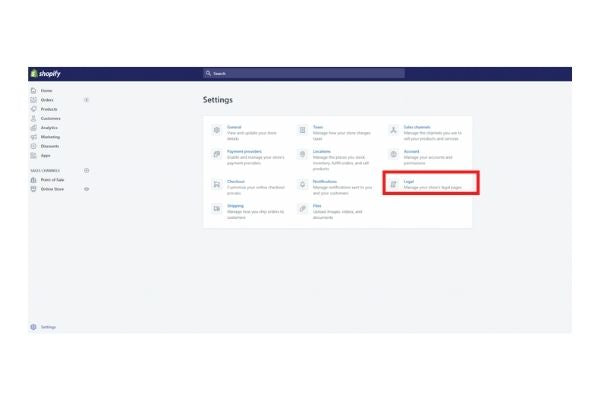
To configure payment methods in the Shopify platform, click on "Settings", which is located in the lower-left section of the store's homepage.

In the “Settings” section, access “Payment providers”

You can customize the payment methods to your store's configuration; many preconfigured payment forms are available:

Click on Accept Payment Methods

*Note: If Shopify Payments appears to you, you can select it as well, but be aware that this ooption is not available in most countries.
When you select a payment method, you must follow the instructions which appear on the screen to configure it. Your payment method will depend on your country, but you can always use Paypal.
PayPal Express Checkout: this method allows you to add the button “Checkout with PayPal” so that your customers’ orders are made within the PayPal platform. You can get more information at the following link: https://www.paypal.com/webapps/mpp/express-checkout NOTE: YOU NEED TO CREATE A BUSINESS PAYPAL ACCOUNT TO START ACCEPTING PAYMENTS
Alternative payment methods:This section allows you to customize payment methods that are compliant with Shopify, which are alternative to the previous ones. Changed WordsStructural ChangesLongest Unchanged Words
Manual payments: you can set up manual payment methods for your online store, such as bank transfer.
You can check which payment gateways your e-commerce platform works with. Just enter to the platform’s official extension catalog or documentation and look into the “payments” section. Check here
Best Payment Gateways
Paypal:PayPal is a popular payment gateway for shops. It is widely accepted in over 200 nations. Without a question, it can be a lucrative addition to the primary payment portal. Which would increase traffic to the platform. Additionally, if the primary payment portal is unavailable due to technological difficulties, PayPal will serve as a replacement. It accepts all major credit cards, including Visa, Mastercard, American Express, and Citibank. Click here for more information.
Stripe:Stripe is a global company with a presence in 44 countries (You can check here if it is available in your country). Additionally, it has full leverage over the checkout experience, which contributes to its popularity. It is very common among online stores in the United States and Canada. Additionally, you would not be charged a monthly bill. Additionally, it has a slew of helpful and efficient tools, ranging from in-store purchases to robust security and an in-depth dashboard. Additionally, it supports a variety of payment methods, including several eWallets. However, it does not support PayPal, although you can get around this by using several separate payment gateways. Click here for more information.
Authorize.net: Currently, Authorize.net is available in over 33 nations. It is one of the most developed and reputable payment gateways for credit card users. Indeed, it accepts all big credit cards – MasterCard, Visa, American Express, Diner's Club, Discover, and JCB, to name a few. Additionally, it accepts wireless payment methods such as Apple Pay, PayPal, and Visa Checkout. Click here for more information.
2Checkout: 2Checkout is an excellent option for online stores with a worldwide presence. It operates in over 87 countries and 15 languages. It is one of the biggest credit card gateways on the market and accepts all big credit cards, including Mastercard, Visa, Diners Club, and American Express. Furthermore, it is used in a large number of developing countries, where it is used in conjunction with another payment gateway. Click here for more information.
Shopify Payments: Shopify has collaborated with Stripe to provide Shopify customers with their own in-built payment portal. It is without a doubt the strongest payment portal for Shopify, with support in 11 nations. Shopify Payments is pre-integrated with the shop and is incredibly simple to configure and use. If you use Shopify purchases on Shopify, Shopify will not charge you a tiny transaction fee but will still charge you the standard payment gateway transaction fee. However, there is a long list of stores that they do not accept. Additionally, if you do not use Shopify, you would be unable to use Shopify Payments. Click here for more information.
Tip 1 -Use more than one payment gateway
You can use several payment gateways to simplify the process for consumers and to include more options for your customers. Increased options equates to increased flexibility for the consumer and decreased pressure at the checkout. Paypal is an important payment portal since it is accessible in the majority of countries worldwide, allowing you to sell globally. Additionally, you can determine the target audience's preferred payment options and verify that the payment gateway supports them.
Attention to the fees
Ensure that you thoroughly review the gateway's fee arrangement prior to making a long-term commitment.
For more information regarding the payment methods allowed by Shopify, we strongly recommend that you access the official online Shopify manual: https://help.shopify.com/en/manual/payments/third-party-providers.
Configuration of shipping costs on Shopify
By default, Bubora stores have already configured the shipment rates based on item's weight, you can always configure the shipping according to your price strategy or shipping price changes.
Your store will automatically calculate shipping at checkout according to the item weight and delivery country.
Your store will have Express Shipping (DHL) and Standard Shipping configured to the following countries. If you would like to add more please contact support.
- United States
- Canada
- Mexico
- European Union
- Tailand
- Philippines
- Brazil
- Australia
Shipping price increase or decrease
Our team will let you know when there is a shipping price increase or decrease. Depending on your pricing strategy we recommend you make the proper changes in the shipping.
So how do I change or check shipping costs?
Access the Shopify platform and, in the left-hand menu's bottom corner, select the "Settings" button. Once inside, click the "Shipping" option.

Within this option you will find the entire configuration relating to Shopify shipments. To start configuring the delivery costs, click on “Manage Rates”.

Once within, you can see that the shipping price is related to item weight. You need to click on the three dots to edit each rate one by one of them according to your strategy or shipping price change.

A pop-up will appear where you can edit the shipping price and rate name.

Store preferences

Creating entries and configuring the blog in Shopify
To keep your website well-positioned in search engines, work on this section. Shopify makes it possible to set up posts to act as though they are part of your shop. To start a new articles on your store's page, in the left panel of the Shopify admin, select “Create new blog entry.

By clicking on “Create a blog post”, an editor will appear which will allow you to create, edit and configure a new entry for your store’s blog.

The screen allows you to customize the blog title and material from an editor panel that appears on the right side. You may also define a default picture for your page, which will appear if the featured image.You may make the chosen blog entry visible or hidden, and choose a date on which you want it to be “revealed.”
General configuration of Shopify
From the “General” section of the Shopify store configuration, the following configurations can be made:

Store details: This segment displays the details that was entered into Shopify during the store's development.
Legal
You will need to access the “Preferences” section of the Shopify control panel.
Bubora already set-up this for you and are already shown in the Navigation Menu inside Online Store Menu
Bubora already set-up this for you and are already shown in the Navigation Menu inside Online Store Menu
In accordance to Buboras Policies you already have this policies in your store: